After my first post about posting on facebook wall had some feedback I decided to create another tutorial for twitter since the system is very similar.
Twitter also uses oauth, so you will need to ask for the user’s permission in order to update his status (once again the “old” methods that allowed you to do anything you like if you find out the password are useless and this is a good thing).
Another good reason to write this post was the fact that most of the examples (and the highest ranked on google) you find now on the web use the old method to update the status. That system was very simple but it is not working any more (since twitter switched to oauth only). So if you have a script that wants to do this just by calling an url using curl and authenticating with username and password stop debugging it as it will never work.
Create twitter application
As I said, the system is very similar to the one used on facebook so if you are familiar to it you will find this familiar. If not after you will understand this I am sure that you will be able to understand the other post also.
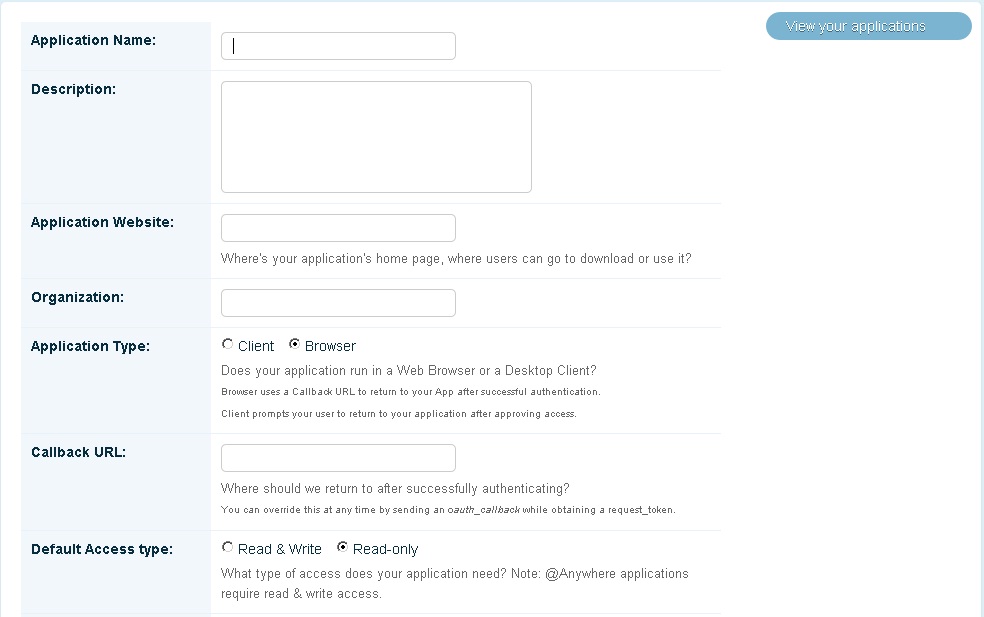
So the first thing is to create a twitter application. For this, after you log in, go to http://dev.twitter.com/apps/new an fill in that form. Make sure that you enter a valid callback url, that points to the script that will save the authentication token. (so let’s say that it will be something like http://www.example.com/tw_users.php).
Also remember to check “Read and Write” under Default Access Type.
After you filled all the fields submit this form. You will be provided with an api key (customer key) and a customer secret. You will need these values in your scripts.
Get user approval
Now we will create the script that asks the user for permissions to update his status. For this (and the following operations) I used a library I found google-ing for resources. You will find that library in the archive you can download after you complete reading this post.
This script will do a simple thing: redirect the user to twitter with some parameters set so that he will be asked for approval.
	$connection = new TwitterOAuth(CONSUMER_KEY, CONSUMER_SECRET);
	$request_token = $connection->getRequestToken(OAUTH_CALLBACK . '?user=' . $_GET['user']);
	$token = $request_token['oauth_token'];
	$url = $connection->getAuthorizeURL($token);
Saving his access token
After the user will allow your application to update his status he will be redirected to that callback url you provided when you created the application. To that url we added the username (so that this application will be able to post updates at anytime for a user that gave you his username and accepted to use it)
So when the user gets to this page we will save the access token like this:
$connection = new TwitterOAuth(CONSUMER_KEY, CONSUMER_SECRET, $_SESSION['oauth_token'], $_SESSION['oauth_token_secret']);
$access_token = $connection->getAccessToken($_REQUEST['oauth_verifier']);
$userData['Twitter_Access_Token'] = $access_token['oauth_token'];
$userData['Twitter_Access_Token_Secret'] = $access_token['oauth_token_secret'];
$user_tw_username = @$_GET['user'];
// save these fields in our database
The hard part is over now you just need to use the info you have.
Posting new status
Now that you have the access token you can post updates for this user at any time.
The only thing that can change this (and that you might need while testing) is the user revoking your access.
For this go to your twitter account -> settings -> connections and click to the “revoke access” link next to the name of the application you just created.
Now the easiest but most important part: sending the new status:
	$connection = new TwitterOAuth(CONSUMER_KEY, CONSUMER_SECRET, $info['tw_user_access_token'], $info['tw_access_token_secret']);

	$result = $connection->post(
		'statuses/update',
		array(
			'status' => $message
		)
	);
That’s all, you just posted your first update on twitter using php 🙂
For the full working example click here.
In the archive you will find all the sources you need (including that library I found for which I don’t want to take credit.. you will find author contact details in the files) and one file named README.txt that tell you what you need to customize for this script to work.
I hope the post was clear enough and maybe it will help someone. If you have any questions or feedback please use the comment form below.


