As the title says we will continue to build our Sencha Touch MVC app we’ve started in part 1. In this part we will create a controller and two views and learn how to use them.
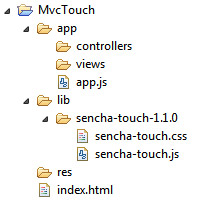
Let’s modify our current project structure by adding some folders:
Creating a controller.
In app/controllers create a file named HomeController.js and add the following content to it:
Ext.regController('Home', {

	// index action
	index: function()
	{
		Ext.Msg.alert('Test', "Home's index action was called!");
	},
});
We create a controller by registering within our application with the function Ext.regController with two parameters: the name of the controller and a configuration object. In the configuration object we will add our custom properties and functions/actions.
A controller action is a function that is called automatically based on a route. A route is an identifier for a controller/action pair and looks like an url: home/index, home/contact etc.
Note: when you add a custom property or a function to the controller you should always add a comma at the end of it to avoid any errors when you later add other properties or functions.
Another note: you should always have the console of the browser opened to watch for errors.
The default route (controller/action pair)
Every Sencha Touch MVC application will have a default route loaded on startup. Before we start using routes in our application we need to define their structure.
In app folder create a file named routes.js and add the following content:
Ext.Router.draw(function(map) {
	map.connect(':controller/:action');
});
With the code above a route will be constructed by two parts: the controller and the action, separated by a forward slash. For more info about a route you could check the documentation.
Let’s set our default route in our application.
Open app.js and set the defaultUrl property to point to Home/index route like this:
Ext.regApplication({
	name: 'App',
	defaultUrl: 'Home/index',
	launch: function()
	{
	},
});
Before testing our application we need to include the created files in the index.html file:
<!-- Sencha Touch framework -->
<link rel="stylesheet" type="text/css" href="lib/sencha-touch-1.1.0/sencha-touch.css" />
<script type="text/javascript" src="lib/sencha-touch-1.1.0/sencha-touch.js"></script>

<script type="text/javascript" src="app/app.js"></script>
<script type="text/javascript" src="app/routes.js"></script>

<!-- CONTROLLERS -->
<script src="app/controllers/HomeController.js" type="text/javascript"></script>

<!-- VIEWS -->
Note: When you’ll start creating more controllers, views etc. there is a possibility that you’ll forget this step and wonder why things are not working as expected. So, don’t forget to include your files in index.html.
Ready for testing!
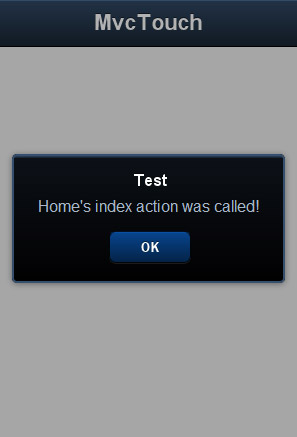
Open index.html in a webkit based browser and you should see a message box.
Creating views
Our views will be created by extending the Sencha Touch components and they will be responsible with the rendering of our data. With them we make our app look cool.
Creating the main view: the Viewport
The first view we need to create when we start a new app will be the viewport. This is our main view in which we’ll render the other ones. You can think of it like a canvas.
in our app/views folder create a file named Viewport.js and add the following content in it:
App.views.Viewport = Ext.extend(Ext.Panel, {
	fullscreen: true,
	layout: 'card',
	cardSwitchAnimation: 'slide',
	dockedItems: [
		{
			xtype: 'toolbar',
			title: 'MvcTouch',
		},
	],
});
What’s in a view?
We create our view in App.views namespace created for us automatically by the application registration.
Our views will be subclasses of an existing component/class. We create them using the function Ext.extend by passing two parameters to it: the superclass (the component we want to extend) and an object in which we’ll add properties and functions.
For our viewport we’ve choosed to extend the Panel class and setting some properties: the fullscreen property to true in order to take all the available space; the layout property to ‘card’ so that only one child component will be visible at a time; the cardSwitchAnimation to ‘slide’ will handle how the child components will be showed on screen.
About the final property, dockedItems, Sencha Touch says: “A component or series of components to be added as docked items to this panel. The docked items can be docked to either the top, right, left or bottom of a panel. This is typically used for things like toolbars or tab bars“.
If you don’t know what is an xtype you should read this.
Now we need to instantiate the viewport in our launch function of our app:
launch: function()
{
	this.viewport = new App.views.Viewport();
},
We assign our viewport instance to a property in our app so that we can access it later in our controller this way: this.application.viewport.
Before testing what we have so far, we need to include the viewport file in our index.html, under the views comment:
<!-- VIEWS -->
<script type="text/javascript" src="app/views/Viewport.js"></script>
Now you can test! You should have something that looks like this:
Creating a controller specific view.
For the views used by a specific controller we will create a new folder, named as the controller (lowercase), in app/views to add them. So, create a folder named home in app/views and in that create a file named HomeIndexView.js. Include this file in index.html
<!-- VIEWS -->
<script type="text/javascript" src="app/views/Viewport.js"></script>
<script type="text/javascript" src="app/views/home/HomeIndexView.js"></script>
and add the following content in it:
App.views.HomeIndex = Ext.extend(Ext.Panel, {
	html: "<h3>A Lover's Complaint</h3>" +
		"<h4>a poem by</h4>" +
		"<h3>William Shakespeare</h3>" +
		"<p>From off a hill whose concave womb reworded</br>" +
		"A plaintful story from a sist'ring vale,</br>" +
		"My spirits t'attend this double voice accorded,</br>" +
		"And down I laid to list the sad-tuned tale,</br>" +
		"Ere long espied a fickle maid full pale,</br>" +
		"Tearing of papers, breaking rings atwain,</br>" +
		"Storming her world with sorrow's wind and rain.</br>" +
		"Upon her head a platted hive of straw,</br>" +
		"Which fortified her visage from the sun,</br>" +
		"Whereon the thought might think sometime it saw</br>" +
		"The carcase of a beauty spent and done.</br>" +
		"Time had not scythed all that youth begun,</br>" +
		"Nor youth all quit, but spite of heaven's fell rage</br>" +
		"Some beauty peeped through lattice of seared age.</p>" +

		"<p>Oft did she heave her napkin to her eyne,</br>" +
		"Which on it had conceited characters,</br>" +
		"Laund'ring the silken figures in the brine</br>" +
		"That seasoned woe had pelleted in tears,</br>" +
		"And often reading what contents it bears;</br>" +
		"As often shrieking undistinguished woe</br>" +
		"In clamours of all size, both high and low.</p>",
});
Ext.reg('HomeIndex', App.views.HomeIndex);
Our HomeIndexView makes use of the html property, where we’ve added some content to our view, and Ext.reg function to register an xtype for our class.
Rendering a view from a controller
Open HomeController.js and alter the index action (function) like this:
// index action
index: function()
{
	if ( ! this.indexView)
	{
		this.indexView = this.render({
			xtype: 'HomeIndex',
		});
	}

	this.application.viewport.setActiveItem(this.indexView);
},
First we test if the view class wasn’t already created. If it wasn’t created we create an instance of it with the controller’s render function and assign it to a variable. We pass to the render function an object with our registered xtype as a property.
After we have a view instance, we pass it as a parameter to the setActiveItem function of our viewport. This function will add the view into the viewport as a child.
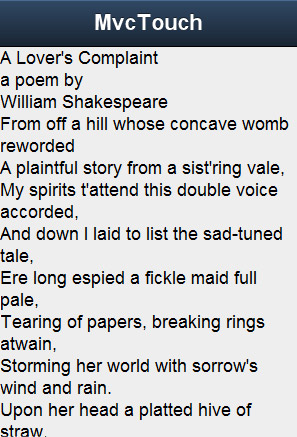
Refresh your browser and you’ll see how the index view shows up on the screen with a nice slide animation from the right to the left (remember the cardSwitchAnimation property we’ve set in our viewport).
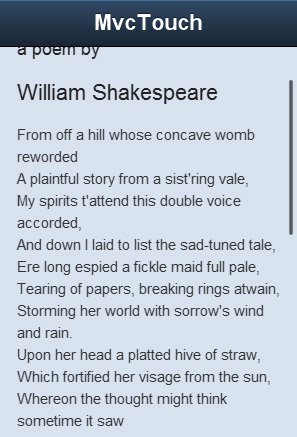
Your app should look like the image above. We’ve added some html tags to our content but it’s still looking like plain text. To fix this we need to set the styleHtmlContent property of the view to true. Also, as you can see, our content is cut off and we have no option to scroll down. In order to enable scrolling we need to set the scroll property to vertical for that. Let’s do that.
scroll: 'vertical',
styleHtmlContent: true,
style: 'background: #d8e2ef',
We also add a style property to add some CSS rules to our view to observe the slide animation better. Now the text should look nicer on a blue background and when you will press and hold the mouse in the view and move up and down you’ll be able to scroll.
That’s it for part 2!
In part 3 we will see how to add more views and how to navigate through them. We’ll also add some buttons to our toolbar.
You can download the current phase of the project from here.
If you have questions, suggestions or improvements don’t hesitate to use the form below.


